Sunday, July 31, 2011

Butternut Squash Pizza

I have not always been successful with butternut squash. In fact, 2 out of the 3 dishes I've ever had to completely trash have been butternut squash recipes. 

This, however, was a complete triumph. I really loved it. So much that I called my mom to tell her about it. I knew even if she thought I was crazy for being so excited over a squash that she still had to love me.


Part of the problem with the large squash varieties is that for a lot of recipes you have to peel, seed, and roast for up to an hour, then puree them - in addition to the rest of the prep for the dish. My favorite mac and cheese recipe took me at least 3 hours to make the first time around (it got faster the next time, since I knew what I was doing).

This is a great way to do it because after the initial ten minutes of peeling, seeding, and slicing, it's not a huge time killer. I put it all in a tupperware and just cooked what I needed as I wanted it.

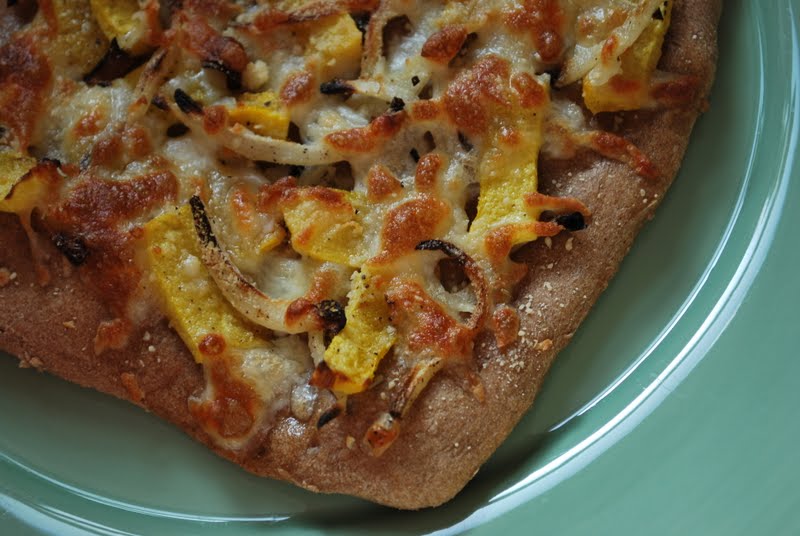
You know how much I love pizza - especially homemade pizza. This is no exception - possibly one of the best pizzas I've ever made!

Butternut Squash Pizza

1 medium butternut squash, peeled and seeded
1 small onion, red or white variety, sliced
Salt and pepper
Olive oil
Mozzarella cheese or Ricotta cheese
Parmesan
Thyme
Rosemary

Preheat oven to 400 degrees. On a baking sheet, toss slices of butternut squash and onion with 1-2 teaspoons of olive oil and spread out evenly. Season with salt and pepper, then roast for about 10-12 minutes until tender (check at about 8 minutes to make sure they're not burning). Remove from oven and set aside, then turn oven heat up to 450 degrees.

Roll your pizza dough out to desired shape and place on a baking sheet (pizza stones are best). Sprinkle thyme and rosemary to taste (I don't love thyme, but it was worth putting a sprinkle or so to complement the squash) over the dough. Spread the cooked squash and onions over the top, then cover with desired amount of cheeses (if using ricotta just drop small spoonfuls around the pizza and cook as is).

Bake in oven for approximately 15 minutes, or until dough is cooked through and cheese is slightly browned and bubbly. Enjoy!


*I make personal pizzas one at a time, which is my preferred method so it's cooked freshly rather than reheating pizza slices later. The dough recipe will usually make 6-8 good-sized slices of pizza, or 6 personal size pizzas.

Friday, July 29, 2011

Food Fact Friday: Which milk is best?


I am a huge milk lover. Always have loved it, and more recently I've appreciated it for its nutrients and protein content. Particularly since osteoporosis runs in my family, I make a real effort to get in all my daily servings. But lately I've become curious about different kinds of milk. I have a sister who avoids dairy altogether, a sister who only buys organic, and another sister who had to give it up when her baby was having issues with reflux and tried all kinds of alternatives.

I came across this article and thought that it was a great run-down on milk options and the array of health benefits. Read the whole thing for even more info.


Cow's milk
Pro: Hands down, cow's milk has the most calcium, and almost double the protein of any other type of milk. And because it comes in several types — whole, 2 percent, 1 percent or skim — that nutrition is accessible no matter which option is chosen.
Con: Lactose intolerance affects a substantial number of Americans, causing abdominal pain, gas, bloating or diarrhea. But the condition doesn't mean it's necessary to go lactose-free. According to the National Digestive Diseases Information Clearinghouse, those with lactose intolerance can typically drink up to four ounces of milk several times a day without experiencing symptoms.

Soy milk
Pro: Made by soaking soybeans and grinding them with water, soy milk is rich in protein and calcium and has no saturated fat. It also scores low in calories and comes in many flavors.
Con: Soy products can inhibit protein and mineral absorption, offsetting its health benefits.
Studies investigating soy’s role in breast cancer have yielded mixed results. Some findings suggest a substance in soy acts as a hormone in breast cells, fueling increased cancer risk.

Almond milk
Pro: Made from ground almonds mixed with water and sweetener, almond milk has become quite popular in the last several years.  It shares several properties of dairy milk: Both have a wide variety of vitamins and minerals, and a comparable fat content. Almond milk also has a rich, nutty taste and comes in several flavors, making it an attractive alternative for those allergic to dairy or soy.
Con: Protein is sparse in almond milk, with only 1 gram per cup, compared with 7 and 8 grams for soy and cow's milk, respectively. It's not suitable for those with nut allergies and lacks the B vitamins in cow's milk. Some almond milk has substantial amounts of sugar added, making it worth a peek at each brand's ingredient list.

Rice milk
Pro: Made from ground rice, this type of milk is very low in fat and calories. It also comes in plain or vanilla flavors and is lactose- and soy-free.
Con: Nutritionally, rice milk falls short compared with other varieties. It lacks Vitamins A and C, and contains very little protein. It should rarely be chosen thinking it's going to provide some superior nutritional health benefit, because it's not.

Organic milk
Pro: Passionate supporters of organic food and products appreciate that it was produced without growth hormones, antibiotics, pesticides or synthetic fertilizers.
Con: The cost of organic milk is about double that of nonorganic milk because of its perceived health benefits. But in actuality, it's not significantly healthier than typical milk, if at all.

Thursday, July 28, 2011

Whole Wheat Pizza Dough

This is my go-to pizza dough recipe. Requires 4 ingredients, is super easy, and freezes well. Some pizza purists might balk at dough without olive oil, but I honestly prefer this dough to most other pizza doughs - I'm not a girl that loves really greasy/oily crusts.

Almost Instant Whole Wheat Pizza Dough

1 cup warm (not hot) water
1 tsp salt
1 1/4 tsp instant yeast
2 cups whole-wheat dough

Combine warm water, salt, and yeast in a large bowl. Stir and let sit for about 10 minutes until you see a bubbly patch rise in the center. Add flour in batches, mixing until completely combined. Form dough into a ball, cover with a towel and set aside (preferably in a warm place - I put mine in the windowsill so the sun shines on it). Let rise for 2 hours. When doubled in size, place on a lightly floured surface and roll out flat. Use as a large pizza crust or separate into 6 sections, bag, and refrigerate up to 4 days (or freeze and thaw before using again). 

Enjoy!

Tuesday, July 26, 2011

Baked Kale Chips

Before:

After:
 

Kale is probably something most people don't try, unless they grew up eating it or are consciously trying to eat healthier. Otherwise, why eat baked kale chips when you can eat salty and fried potato chips out of a big bag? Much more convenient. 

Except that kale chips are INCREDIBLE. Seriously. My roommate and I polished off the whole pan in about 2 minutes flat. At first I was thinking that they were ok, but that I probably wouldn't want to make them all the time. Then after my 3rd or 4th chip, I realized that they were addicting and delicious. 

Baked Kale Chips
serves 2-3

1 bunch kale (curly varieties work well)
Extra Virgin Olive Oil
Sea salt/garlic salt/Parmesan cheese

Preheat oven to 300 degrees. Wash the kale thoroughly, remove tough stems, and rip into bite-sized pieces. Using a salad spinner or paper towel, dry as well as possible. Fill a large zipper bag with kale pieces and pour in a few teaspoons olive oil (you just need barely enough to coat the leaves), zip, and shake or massage until leaves are covered. Spread on a baking sheet and sprinkle with sea salt, garlic salt, grated Parmesan, or other seasoning of your choice. Bake for about 20 minutes, checking periodically to make sure not to overcook (the outside edges should just be crisp - you don't want the leaves to crumble). Do NOT stir or attempt to flip midway - the chips will bake nicely on their own. 

Enjoy!

Sunday, July 24, 2011

Strawberry White Chocolate Cheesecake Trifle

Usually I don't jump up and down over trifle - I'd prefer a warm, gooey, chocolatey dessert instead (yes, even in the summer) - but this trifle got me pretty excited. I was originally going to make the Red, White, and Blueberry Trifle from Skinny Taste over the fourth of July weekend, but everyone kept making birthday cakes so I just bagged the idea. Luckily my mother encourages my love of cooking so we made it together for Sunday dinner last week with what we had. It was dangerously delicious, but luckily less guilt-inducing than the desserts I'd usually go for!


Strawberry White Chocolate Cheesecake Trifle

10 oz angel food cake, cut into 1-inch cubes
2 pints strawberries, sliced

Filling:
6 tbsp fat-free sweetened condensed milk
1 1/2 cups cold water1 package white chocolate cheesecake instant pudding mix
12 oz lite frozen whipped topping, thawed

Whisk the condensed milk and water in a bowl. Whisk in the pudding mix for 2 minutes. Let stand for 2 minutes or until soft-set; fold in the whipped topping.

Arrange half of the cake in the bottom of a 14-cup trifle dish. Sprinkle evenly with a layer of strawberries. Pour half of the cream mixture over the berries and gently spread. Layer the remaining cake cubes on top, then add more strawberries and top with the remaining cream mixture. Top with one sliced berry (to make it pretty). Cover and refrigerate at least one 1 hour.

Makes 12-14 one-cup servings. Enjoy! 

Friday, July 22, 2011

Food Fact Friday: the "'natural' is healthy" myth

Legally, food labeled "natural" does not contain any artificial ingredients, coloring ingredients, or chemical preservatives, and, in the case of meat and poultry, is minimally processed. 

The FDA makes no serious effort to control the use of the word "natural" on nutrition labels. Case in point: 7UP boasts that it’s made with “100% Natural Flavors” when, in fact, the soda is sweetened with a decidedly un-natural dose of high fructose corn syrup. “Corn” is natural, but “high fructose corn syrup” is produced using a centrifuge and a series of chemical reactions. Other "natural" abusers include Natural Cheetos, which are made with maltodextrin and disodium phosphate, and “natural advantage” Post Raisin Bran, which bathes its raisins in both sugar and corn syrup. The worst part is, you're likely paying a premium price for common junk food.


I don't care how you package it - Cheetos will NEVER be natural. This is a bit disturbing to me.


info from here

Wednesday, July 20, 2011

Zucchini Pizza Bites

These are really easy (almost not worth giving a recipe!) and extremely delicious. I imagine that if you have kids who hate vegetables this might be one of those sneaky ways to get them to eat it (although I'm not exactly a proponent for being "sneaky" about healthy foods). It's also a good low-calorie snack and very tasty.

Try it out!


Zucchini Pizza Bites

1 medium zucchini, sliced into rounds
2-3 Tbsp favorite pasta sauce (or tomato paste with Italian seasoning)
1/4 cup shredded mozzarella/Parmesan cheese
Cooking spray

Heat oven to 450 degrees, or turn on your broiler (I cannot figure out the broiler on the oven in my apartment - embarrassing, I know). Line a baking sheet with cooking spray and place zucchini rounds on sheet. Cover the tops with cooking spray. Bake/broil the zucchini for about 6-7 minutes until slightly tender.

Remove from oven, top with a small amount of pasta sauce and cheese, then continue cooking for 3-5 minutes until the cheese is bubbling (if you're using the broiler watch it carefully so it doesn't burn on top).

Enjoy!


idea from skinny taste

Monday, July 18, 2011

Stuffed Pepper with Mediterranean-Spiced Quinoa

I love love love this dish. I've made it several times since making it for the first time in March, and enjoy it every time. It isn't hard to make either, I promise!


Stuffed Pepper with Mediterranean-Spiced Quinoa
Serves 2

1 tsp olive oil, extra-virgin
  
1/2 small onion(s), yellow, diced  
1/2 tsp kosher salt  
1/2 tsp minced garlic  
1 cup diced tomatoes, Italian seasoning added (or use canned Italian-style)
1/2 cup quinoa, rinsed if indicated on package  
1/2 cup water  
1/4 tsp table salt  
2 medium sweet red peppers
1/2 cup canned chickpeas, rinsed and drained  
1 tsp dried basil   
2 Tbsp reduced-fat feta cheese  

Preheat oven to 375ºF. Coat a foil-lined baking sheet with cooking spray.

Heat oil in a medium-sized saucepan over medium heat. When hot, add onion and kosher salt; cook, stirring occasionally until onion softens, about 5 to 7 minutes. Add garlic to pan; cook, stirring, 30 seconds more. Add tomatoes and their liquid, quinoa, water and table salt to pan; stir well to combine. Increase heat to high and bring to a boil; reduce heat to low and simmer, covered, until quinoa is tender, about 15 minutes.

Meanwhile, slice top off each pepper and remove core, ribs and seeds; reserve tops for another use. Make a thin slice across bottom of each pepper so it sits flat; place on prepared baking sheet. When quinoa is done cooking, stir in chickpeas and basil.

Spoon quinoa mixture into pepper; bake, uncovered, 25 minutes. Remove from oven and sprinkle with 1 Tbsp feta; return to oven and continue cooking until feta is slightly melted, about 5 minutes more. Yield 1 stuffed pepper per serving.

Tuesday, July 12, 2011

Pumpkin Pasta Bake


Pumpkin Pasta Bake
serves 2

1 tsp olive oil
3.5 oz whole wheat uncooked pasta*
1/3 cup low-fat cottage cheese
1/3 cup pumpkin puree
2 Tbsp egg beaters
2 Tbsp plain non-fat greek yogurt
1/2 teaspoon salt
black pepper
1/8 teaspoon ground nutmeg
1/8 teaspoon ground ginger
1/2-1 tsp dried thyme
1 garlic clove, finely chopped
2 Tbsp shredded Parmesan, divided

Heat the oven to 375°F. Lightly coat a small baking dish with cooking spray. Set aside. Bring a pot of water to boil over high heat, and add the pasta, turning the heat down to medium. Cook for a slightly shorter amount of time than specified by the package. (For instance, if the package specifies 10 to 12 minutes, cook for 9 to 10, or until just barely al dente.) Drain the pasta and toss lightly with olive oil.

In a large bowl, whisk together the cottage cheese, pureed pumpkin, egg beaters, and yogurt. Whisk in the salt, pepper, nutmeg, and ginger. Stir in the pasta and coat completely with the pumpkin mixture. Stir in the thyme and garlic. Stir in 1 Tbsp parmesan.

Spread the mixture evenly in the prepared baking dish and sprinkle the remaining Parmesan over top. Bake uncovered for 30 minutes or until golden brown on top. Let stand for 5 minutes before serving.

*Make sure to use a pasta like penne, small shells, or rotini. Spaghetti would work, but won't gather the sauce as well. 

Monday, July 11, 2011

Vegetable Polenta Lasagna

Never tried polenta before, but lately have wondered more about it. So when I saw it on sale in the "health food" section of Smith's, I grabbed a package. Purists may frown upon buying the pre-cooked, packaged stuff, but whatever. I didn't really want to invest the time on a time-intensive dish that I wasn't sure I'd like, so this was a good alternative.  

Polenta is made with ground yellow or white cornmeal (ground maize), similar to gruel or porridge. Polenta was originally and is still classified as a peasant food in Italy, being in the North the equivalent of pasta in the south – cheap, filling, and readily available. During Roman times, it was a staple of the Roman legions, eaten in porridge or hard cake form. Before the arrival of corn from the New World at the end of the 15th century, polenta was made with starches like farro, millet, spelt or chickpeas. Since the late 20th century polenta has found popularity as a gourmet dish and is served in high-end restaurants as well as sold widely in supermarkets as a specialty item. 

Seeing that it is usually used as a pasta substitute, and finding some recipes online that used it in lasagna, I threw together my own version. Pretty quick and easy, particularly if you have everything pre-diced, which I did the night before. I really liked this, but I'll warn you - it probably isn't family friendly. Definitely for the health-food junkie.


Vegetable Polenta Lasagna

18 oz pre-packaged polenta, sliced into about 12 thin rounds
1 cup pasta sauce
1 teaspoon extra-virgin olive oil
Sprinkle red pepper flakes
1 tsp minced garlic
¼ cup diced onion
¼ cup diced eggplant
¼ cup diced bell pepper
¼ cup diced zucchini
¼ cup diced yellow squash
1 large tomato, sliced thinly
1 cup fresh chopped swiss chard or spinach
2/3 cup low-fat cottage cheese (or ricotta)
1 cup shredded mozzarella cheese
1 Tbsp Parmesan cheese

Preheat oven to 375 degrees Fahrenheit. Spray polenta slices with cooking spray and bake for about 8-10 minutes on a prepared cookie sheet, flipping halfway through.

Meanwhile, sauté diced onion, eggplant, zucchini, squash, and bell pepper in 1 tsp olive oil until tender-crisp, about 5-6 minutes. Remove from heat and set aside on a baking sheet lined with paper towels to let drain a bit.

When polenta is done, layer enough slices to cover the bottom of a prepared baking dish (8x8 worked for me). Top with a thin layer of pasta sauce, swiss chard or spinach, sliced fresh tomatoes, veggie mixture, 1/3 cup cottage cheese, and 1/2 cup mozzarella. Repeat with remaining ingredients, finishing with 1 Tbsp shredded Parmesan.

Bake uncovered for about 25 minutes.

Serves 4.

Enjoy!

Monday, July 4, 2011

Baked Banana Oatmeal


Baked Banana Oatmeal
Makes 1-2 servings

1/2 cup old-fashioned or steel-cut oats
1 tbsp brown sugar
1/4 tsp baking powder
1/4 tsp cinnamon
1/8 tsp nutmeg
1/2 cup milk
1/2 tsp vanilla extract
1 banana, mashed

Preheat oven to 350*F and coat a small loaf pan or individual baking dish with non-stick cooking spray.

Combine all ingredients in a mixing bowl, then pour batter into pan and spread evenly with a spatula.

Bake for 30 minutes or until top is lightly browned. Let sit and cool until warm, then enjoy!